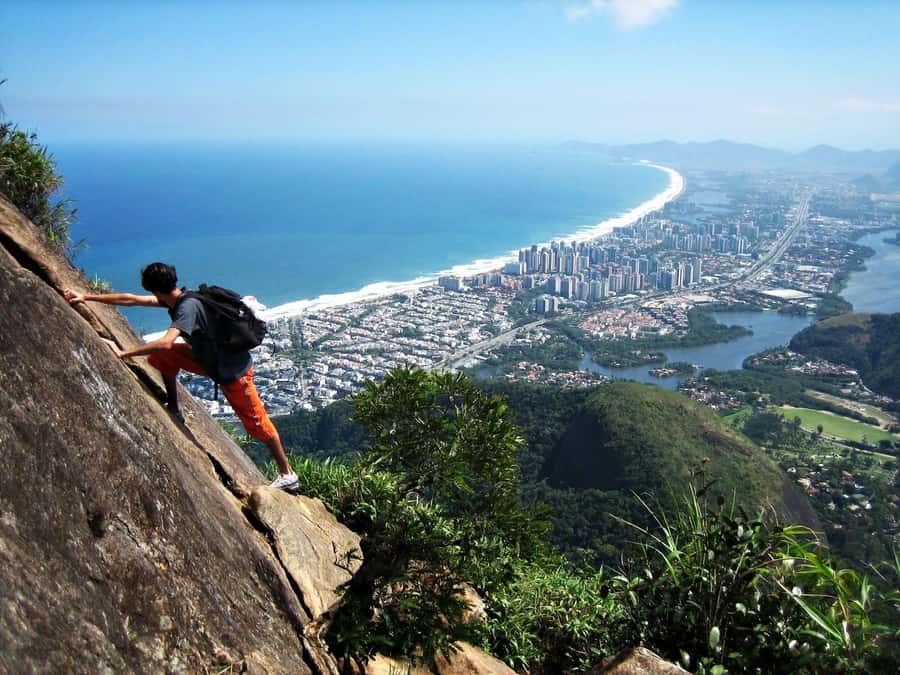
This hike turns Rio into a climbing lesson. You’ll tackle Pedra da Gávea, one of Rio’s most famous rock monoliths, with certified eco-adventure guides and specialist climbing equipment that makes the technical bits feel manageable. The reward is big: dramatic panoramas over south and west Rio.
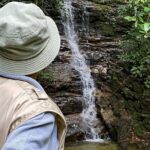
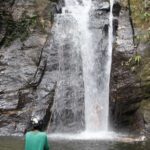
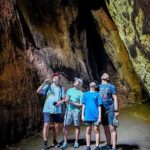
I love that this isn’t just a walk in the forest. You’re moving from shaded trails up through Tijuca National Park, then taking on a short stretch of basic rock work in the Carrasqueira area before the summit views.
One consideration: this is a difficult hike with real scrambling and some light climbing. If you’re not comfortable with heights, or if your footwear grip isn’t solid, you’ll feel it—so don’t underestimate it.
In This Review
- Key Things You’ll Notice on This Pedra da Gávea Hike
- Pedra da Gávea: Why This Hike Earns Its Reputation in Rio
- How Hard Is It Really? The Smart Way to Judge Your Fit
- The Route From Sea Level to the Summit: What the Day Feels Like
- Carrasqueira Rock Work: How the Safety Setup Helps
- Views From the Top: What You Gain at the Summit
- Gear and What to Pack: Don’t Skip the Boring Stuff
- Meeting Point and Small-Group Pace: How Your Day Stays Organized
- Guides Matter: Eduardo, Lucas, Sergio, Fernando, and the Photo Skill
- Price and Value: Is $56 Worth It for a Rio Mountain Day?
- The Weather Reality in Rio: When the Mountain Calls Off the Plan
- Should You Book This Pedra da Gávea Hike?
- FAQ
- How long is the Pedra da Gávea hike?
- Is prior rock climbing experience required?
- What’s included in the tour price?
- What should I bring?
- Are there restrictions on bags or shoes?
- Where is the meeting point, and is transportation included?
Key Things You’ll Notice on This Pedra da Gávea Hike
- Sea-level start, ~840 m finish: You gain altitude fast, and the trail feels like a workout.
- Carrasqueira technical section (with safety gear): There’s a rope-and-gear supported climb of roughly 30 m.
- No prior climbing needed, but you do use your hands: Plan for strenuous effort more than pure athletics.
- Small group limit of 6: Easier control at the climbing points, and the guide can keep eyes on everyone.
- Photos are part of the experience: Several guides are known for taking great photos and videos during key moments.
- Weather can cancel the day: Cloud cover and rain can change the route conditions, and sometimes the hike won’t run.
Pedra da Gávea: Why This Hike Earns Its Reputation in Rio

Pedra da Gávea is the kind of Rio landmark you can’t ignore. It’s a massive rock monolith rising straight out of the Tijuca National Park area, and the route is built to take you from street-level vibes to near-summit views without feeling like a “tour bus to the top.” The whole hike has that mix of nature, effort, and problem-solving on rock.
What makes this specific version appealing is the way it handles the technical parts. You’re not tossed onto a mountain and hoped-for-the-best. You get a guide specialized in eco adventures plus climbing equipment, and the Carrasqueira section is set up with safety support as you move through it.
If your idea of a great day in Rio includes more than beaches and viewpoints, this hits the sweet spot. It’s a serious hike, but it still feels like you’re doing something authentic—close to the rock, close to the forest, and close to the reality of climbing.
You can also read our reviews of more hiking tours in Rio De Janeiro

How Hard Is It Really? The Smart Way to Judge Your Fit
This hike is described as difficult, and the time on the mountain isn’t just “3 hours of walking.” The route includes an approximately 3-hour ascent on trails, plus the time it takes to move slowly and safely through the climbing areas, take photos, and descend. Plan for a full day around 8 hours total, even if the hiking portion is shorter.
You don’t need prior rock climbing experience. Still, you should expect hands-on movement. There are light climbing stretches and a basic rock climbing segment of around 30 meters in height where you’ll use the provided safety equipment.
Here’s the practical test: be honest about your comfort level with steep ground and exposed moments. Some people find the difficulty manageable with decent fitness, while others say height fear can be a dealbreaker. If you get shaky on ledges or feel panicky when you can’t “step your way out,” this is something to consider carefully.
The Route From Sea Level to the Summit: What the Day Feels Like
You start at sea level and climb through Tijuca National Park toward roughly 840 meters. That altitude change is a big reason the hike feels like more than a stroll. It’s not only the grade—it’s also that you’re moving into terrain where you can’t always maintain a steady walking rhythm.
Expect a lot of trail time first, often with shade from the forest. That helps in Rio’s heat and sun, but it doesn’t remove the challenge. You’ll work steadily upward, and you’ll feel your legs and lungs more than your back.
Then comes the Carrasqueira section. This is where the experience becomes more “adventure” than “hike.” You’ll go through a short climbing area with safety equipment provided by your instructor. Guides help you place your hands and feet, which matters because the rock movement isn’t the same as regular trail steps.
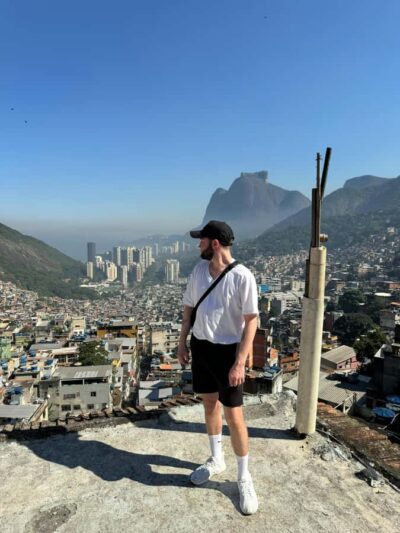
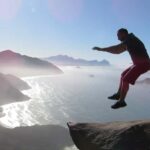
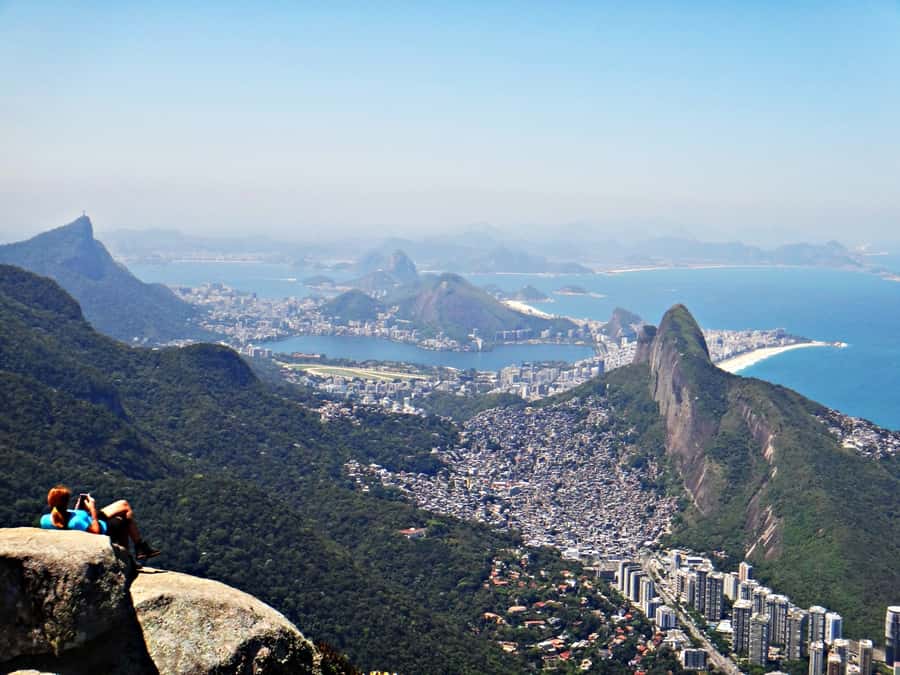
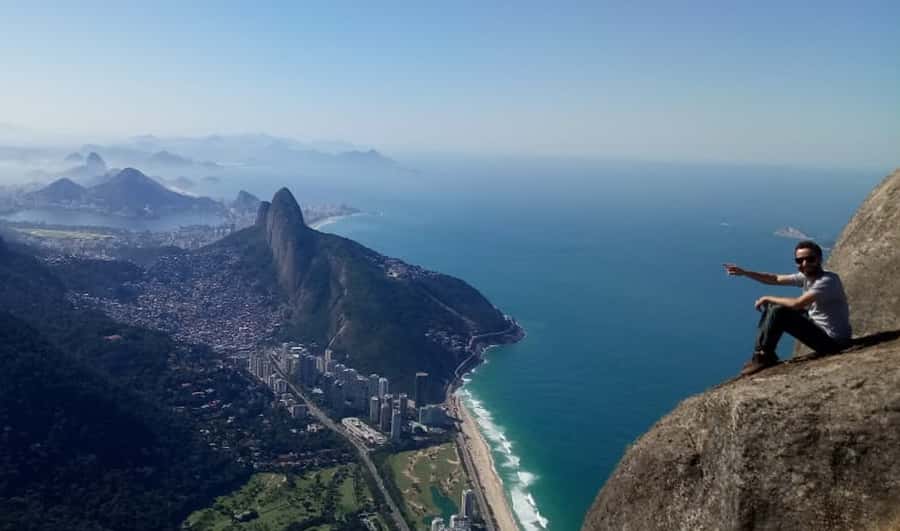
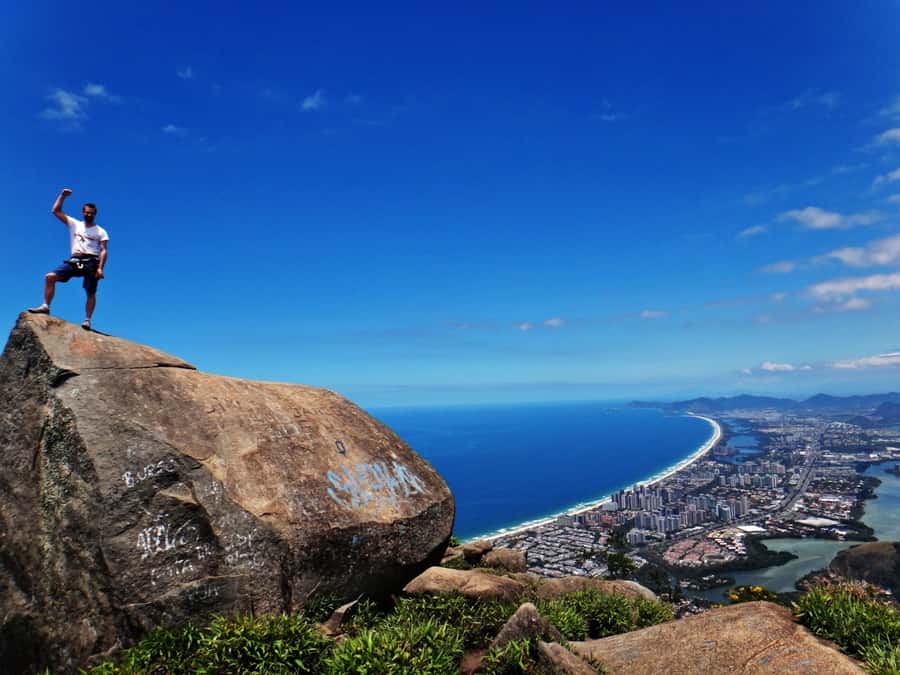
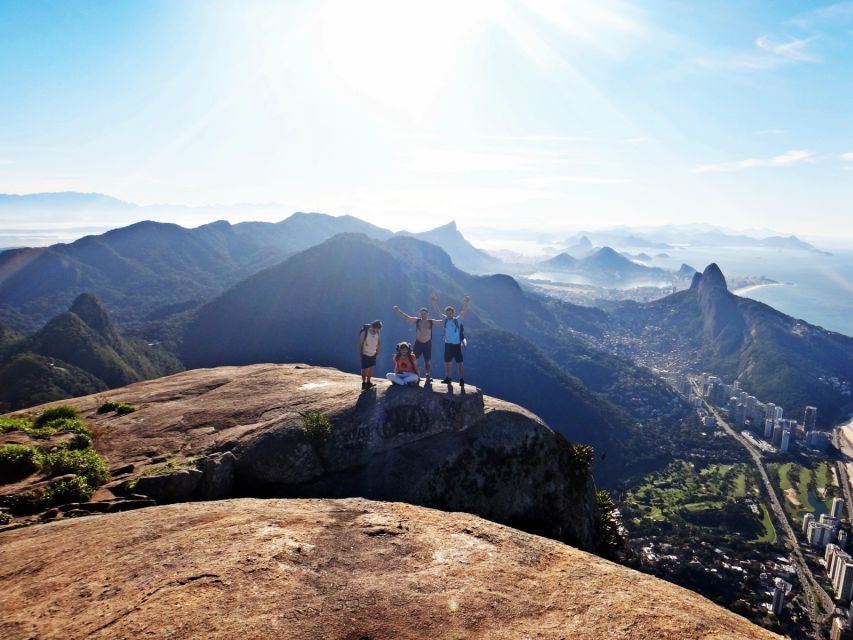
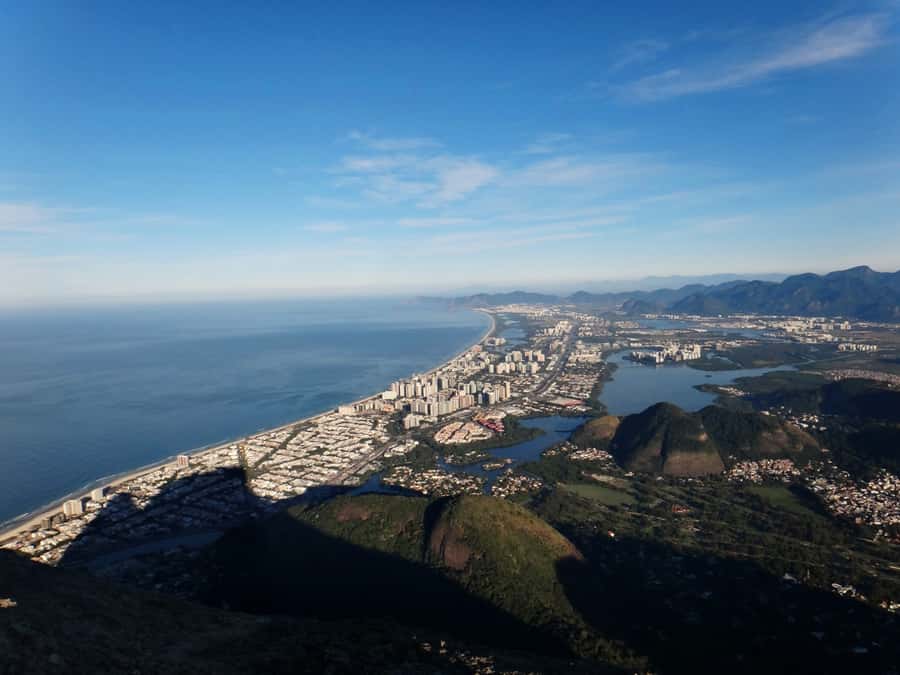
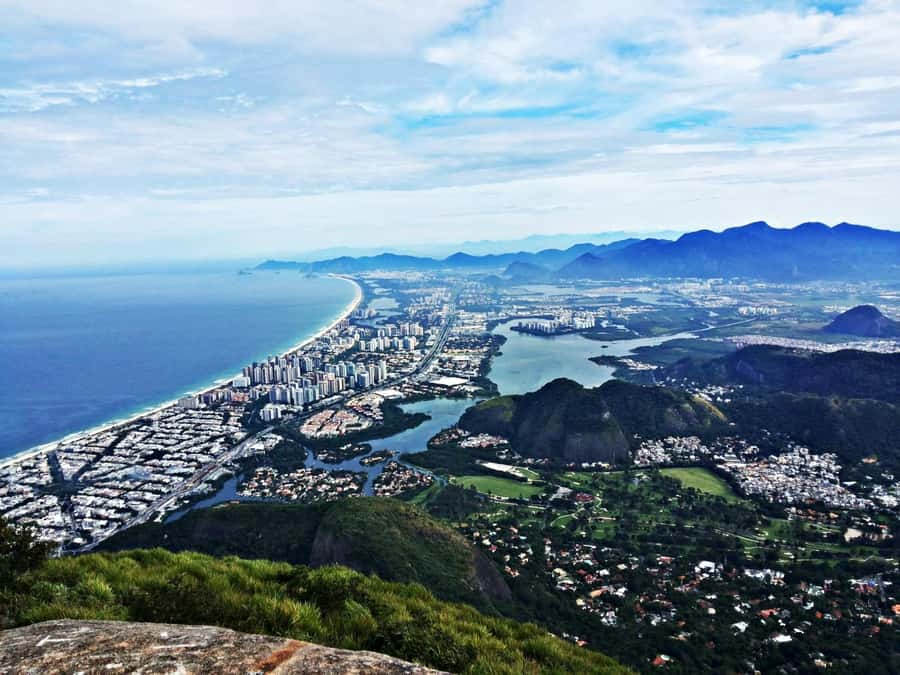
After you pass Carrasqueira, the route continues toward the summit. This is when the effort starts to feel worth it. You’ll get rewarded with views over the south and west parts of Rio de Janeiro, and you’ll likely spend some time up top because it’s not just a quick snapshot stop—it’s a moment.
The descent is often where people judge the day again. Some reports mention minor injuries like an elbow bump, and the good news is the guides react quickly and keep the group safe. Still, you should be prepared for the fact that going down technical rock can be mentally tiring, even when it’s slower.
Carrasqueira Rock Work: How the Safety Setup Helps
This climb isn’t described as technical rock climbing that requires training. But it does involve real climbing elements. You’ll use the safety equipment provided by the instructor during that Carrasqueira segment, and the guides manage the flow so everyone crosses securely.
In practice, that means you’re not just copying your footing from the person in front of you. You’re following instructions—where to step, where to avoid, and how to move through the climbing portion without rushing. Several guides are known for being patient at the tricky steps, which matters because climbing parts tend to take longer than walking parts.
One thing to expect: there can be waiting at climbing and descending points, especially if your group moves at different speeds or the guide is helping someone through a specific move. On a small group of up to 6, it’s usually controlled, but it still means you shouldn’t plan to sprint the day. This is an “experience hike,” not a “set your own tempo and ignore the guide” outing.
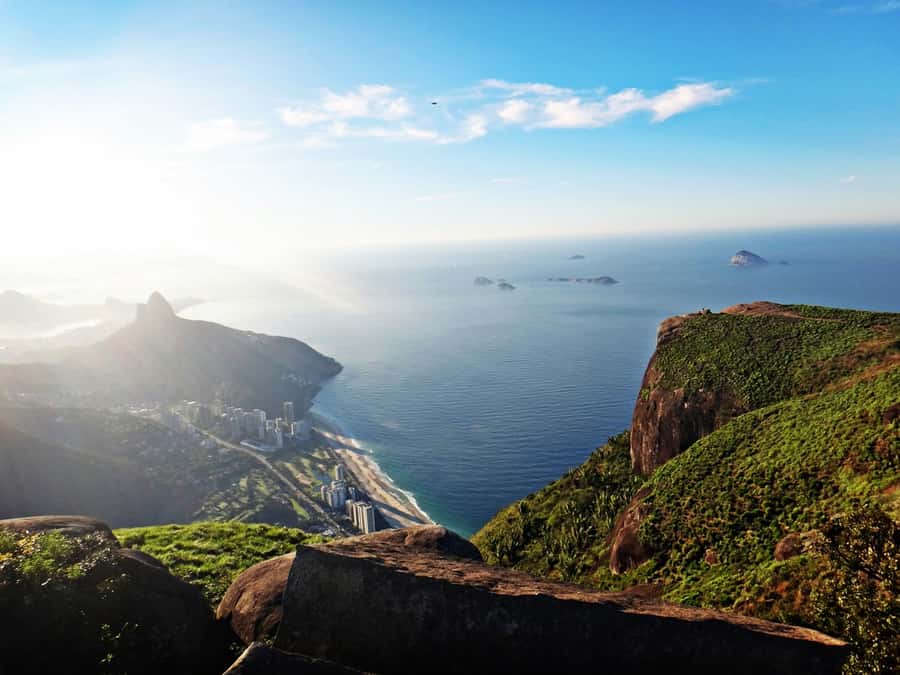
Views From the Top: What You Gain at the Summit
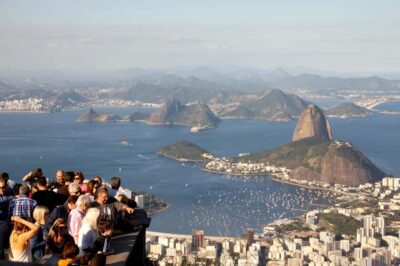
The top payoff is all about scope. You’re not just looking at a nearby peak—you’re looking over Rio, including the south and west areas. It’s the kind of viewpoint that makes the effort feel real because you’re seeing the city as part of a much bigger geography.
Cloud cover can happen, and sometimes it limits how much you can see. On those days, the hike still feels special because you still get the forest-to-rock transformation and the adventure element of climbing through the monolith. But if you’re planning your whole Rio trip around summit visibility, have a backup day in mind.
Bring patience for the summit time too. You’ll want to take photos, and some guides are especially good at capturing people naturally during key moments—at the top and sometimes along the way. That means you might spend a bit longer than you expect simply because the pictures are good and everyone wants to look back at them later.


Gear and What to Pack: Don’t Skip the Boring Stuff
This hike asks you to show up ready, especially because you’re on rock and moving through technical sections.
Bring:
- At least 3 liters of drinking water per person
- Light snacks
- Sunglasses and sunscreen
- A sun hat
- Insect repellent
- Shoes with good grip (no open-toed shoes)
The shoes detail matters more than most people think. On steep rock and scrambling stretches, traction is everything. Smooth soles or worn-out tread can turn a fun climb into an exhausting fight with your footing.
You also should avoid oversize luggage. Pets aren’t allowed, and large bags aren’t part of the setup. If you hate carrying things, pack light and keep only what you truly need.
Light clothing helps because you’ll work hard and sweat. You’ll still want to be comfortable—this is a full-body effort hike.
Meeting Point and Small-Group Pace: How Your Day Stays Organized
You meet at Estrada Sorimã, 932 – Itanhangá, Rio de Janeiro. Transportation isn’t included, so you’ll need your own plan to get there. That’s not a dealbreaker, but it does mean this is best as an organized activity you schedule in advance, not a last-minute walk you stumble into.
The group is small—limited to 6 participants. This affects your experience in a good way. It’s easier for the guide to manage safety at the climbing points, and you don’t get lost in a crowd when the route narrows on rock.
Pace is another factor. The hike includes technical sections, so the group can’t always move at “your pace.” If you prefer a super slow stroll, you might find yourself waiting or feeling rushed during climbs. If you’re fit and comfortable following instructions, the structure feels reassuring rather than restrictive.
Guides Matter: Eduardo, Lucas, Sergio, Fernando, and the Photo Skill
A huge part of the value here is the human support. Guides are specialized in eco adventures and also handle the climbing coaching. Names that show up again and again include Eduardo, Lucas, Sergio, and Fernando, plus others like Thomas and Jessie in some cases.
What I like about the guide approach, based on what’s consistently described: they stay patient, explain steps, and keep the group together. People mention guides taking great photos and videos too—often as part of the day rather than an awkward request. If you’re the type who wants memories you don’t have to stage, that’s a real bonus.
In at least one account, a minor elbow injury happened on the way down, and the guide reacted quickly to reassure and help. That’s not a promise you’ll avoid issues. It’s proof the operation is paying attention during the descent, not just the summit moment.
Also, guides speak Spanish, English, and Portuguese, which makes it easier to feel confident during instruction on the rock. Clear guidance helps you move safer and faster because you’re not guessing.
Price and Value: Is $56 Worth It for a Rio Mountain Day?

At $56 per person, you’re paying for a mix of guided safety plus climbing equipment plus the eco-adventure expertise. That matters because the “technical work” on rock is the part most self-guided hikers would struggle with. The equipment inclusion means you’re not trying to improvise gear at the last minute.
What’s not included is private transportation. That can change the true cost, depending on where you’re staying and how you plan to reach Itanhangá. If you already have a good way to get there, the price feels fair for the amount of guided effort you get.
The other value factor is group size. With a limit of 6 participants, the guide attention usually stays high during the tricky bits. If you’ve ever been in a big hiking group where the slowest person delays everyone, you’ll appreciate the smaller setup here.
In short: if you want a guided mountain hike with actual rock scrambling and safety support, $56 is solid. If you just want a casual walk with city views, you’ll feel underwhelmed by the effort.
The Weather Reality in Rio: When the Mountain Calls Off the Plan
Rio weather can shift fast. This activity is canceled in bad weather. Even without rain, clouds can reduce summit views, and heat makes the climb more demanding.
So I’d treat this as a “plan it, but don’t panic” booking. If you can fit more than one day for mountain time, you’ll give yourself a better shot at clear viewpoints. If your schedule is tight, still book it, but keep realistic expectations that the mountain controls the timing sometimes.
Should You Book This Pedra da Gávea Hike?
Book it if you want one of Rio’s most famous mountains without doing it alone. You’ll get a structured climb through Tijuca National Park, a technical Carrasqueira section with safety gear, and summit views over south and west Rio. You also get small-group guidance and a guide-led approach that helps you handle the rock moves without previous climbing experience.
Skip it or think twice if you hate heights, if you don’t feel steady on steep ground, or if you’re looking for an easy hike you can slow down whenever you want. This is difficult because you’ll use your hands and you’ll work hard in the heat.
If you do go, you’ll make the day smoother by packing the water and traction basics. That boring prep is what turns a scary climb into a memorable win.
FAQ
How long is the Pedra da Gávea hike?
The full activity is listed as about 8 hours, with an approximate 3-hour hike on the mountain. The longer day time accounts for the technical sections, group pace, and the climb back down.
Is prior rock climbing experience required?
No previous rock climbing experience is required. The route includes light climbing and a basic rock climbing segment, but you’ll use safety equipment and get guidance from your instructor.
What’s included in the tour price?
The tour includes a guide specialized in eco adventures and the climbing equipment needed for the technical section.
What should I bring?
Bring sunglasses, a sun hat, sunscreen, insect repellent, light snacks, and shoes with good grip. Plan for at least 3 liters of drinking water per person.
Are there restrictions on bags or shoes?
Open-toed shoes aren’t allowed. Pets and oversize luggage are also not allowed, and luggage or large bags aren’t part of the setup.
Where is the meeting point, and is transportation included?
Meet at Estrada Sorimã, 932 – Itanhangá, Rio de Janeiro. Private transportation is not included, so you’ll need your own way to arrive at the meeting point.